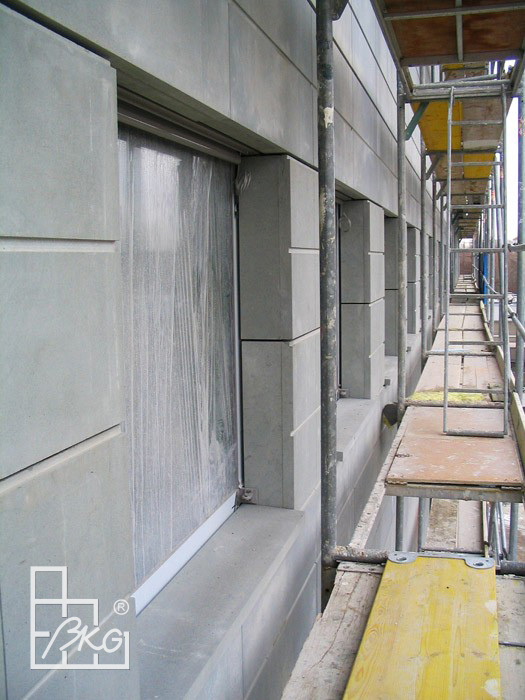
The stone elements are installed to the wall with the help of aluminium, stainless steel or corrosion-proof steel frames. These frames take the load to the bearing element when the direct installing to the wall is unadvisable due to the inefficiency of anchoring (the walls made from materials different than brick or concrete). It is one of the most modern methods of installation – the cladding can be mounted in various positions. The frame for mounting the cladding is hung to the bearing construction of the building or is a self bearing element independent from support, which allows for varied forms of elevation.
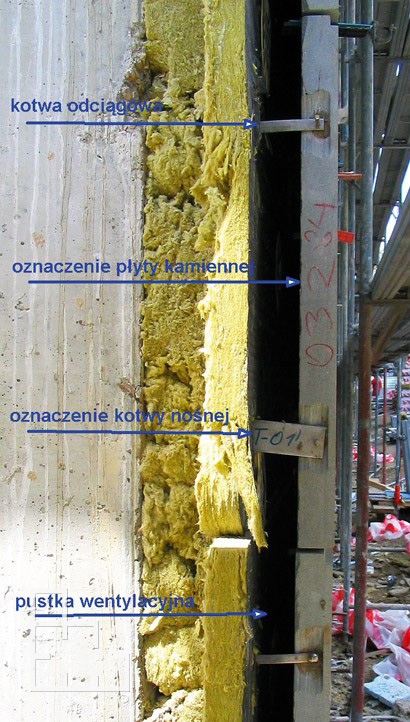
Stone cut-to-size slabs are installed to the frame with the help of welded or screwed anchor bolts, allowing the air space (2-5cm) between the cladding and insulation layer.
A sample process of stone elevation installation is presented below.
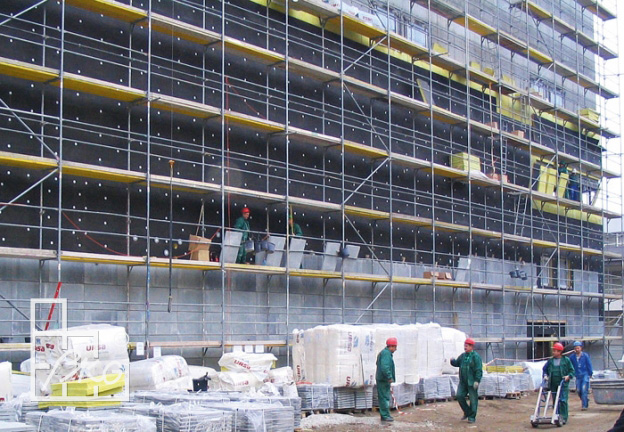
- It is necessary to prepare scaffolding, bore the wall and the insulation layer. It is essential to prepare anchors and stone panels. As the last ones are delivered in pallets, which were reloaded in haste, one must find the right elements to move them to the right wall. There must be at least one logistics coordinator at the construction site, whose task is to find and deliver the right elements for elevation installation workers under the scaffolding. The latter ones are often high on the scaffolding and cannot constantly climb down. The site, where the freight lift operates must be precisely marked and safe guarded, so nobody will accidently walk under the uplifting stone panel.
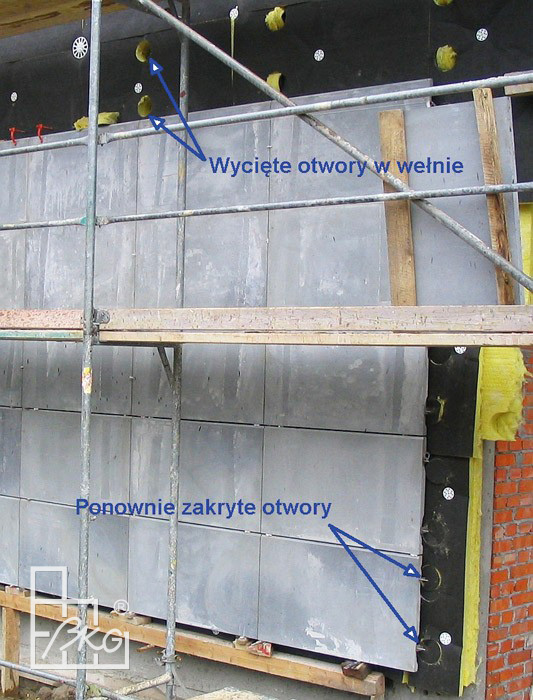
- In order to install a stone panel on the elevation, first the anchor must be installed in prior drilled slots in the wall. After the installation of insulation, all slots are covered with mineral wool. Now the rings of the diameter 15 cm must be cut out in the wool in places of slots. After the installation of the anchors, the cut out piece of mineral wool must be placed in the same site, thus ensuring continuity and seal of insulation. The anchors are mounted in the bearing walls in the fast set cement mortars, which are available as ready to use mixtures on the market. Their basic feature is the setting start time within 60 minutes, the finishing setting time after maximum 5 hours. These mortars reach their full strength after 7 days, but after 24 hours they already have 60% of expected wall strength.
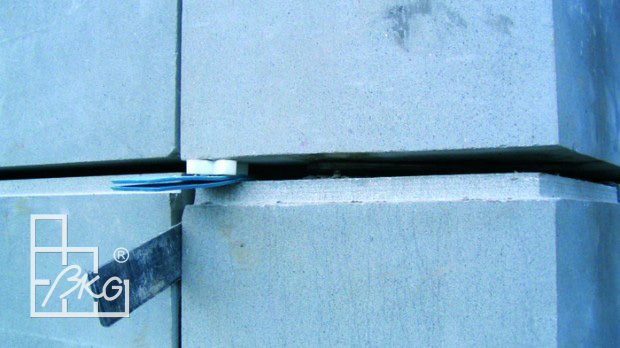
- When installing the wall elements exceptional precision must be taken. It is obligatory to multiple check vertical and horizontal levels. The designed width of each joint must be retained with the help of special bakelite or hard PCV spacers. A minimal deviation of the bottom tile from the plumb-line or the first panel in the vertical grout may cause several millimetre deviation on the other side.
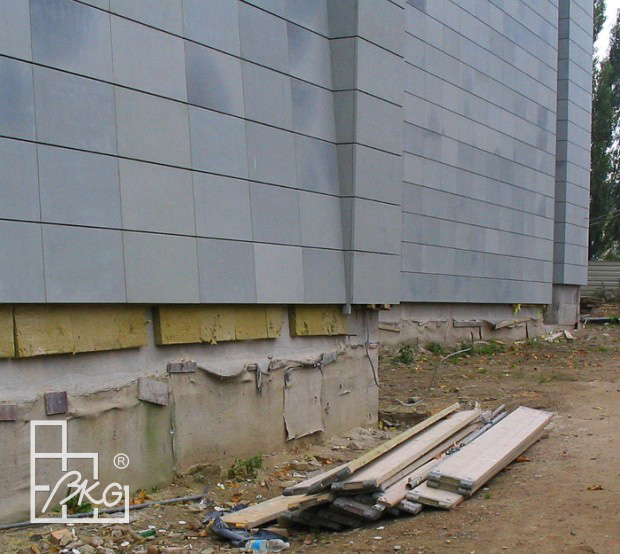
- In the construction works the standard size tolerance is ±1 cm, in many cases the tolerance of ± 2 cm is allowed. When installing the stone elevation the tolerance must be ± 1 mm, which may be hard to understand by surveyors working on sites. It is important to remember that when installing the stone facade one must start from the second layer of stone as a rule. The first layer cannot be installed as the ground area around the building is not properly prepared. This layer is filled in at the end of the construction when the scaffolding is taken off, and the ground levelled. The first for us, the second in the layout layer is supported by wooden logs or H20 formwork beans. This support may be demounted not earlier than 7 days after the instalment when the fast set mortar for anchors reaches its full strength. This time is indicatory and concerns the summer time. As the air temperature is lowered, the needed time period is lengthened. The stone installation cannot be done in temperatures below +5º C as it is specified by mortar, cement and glue producers.
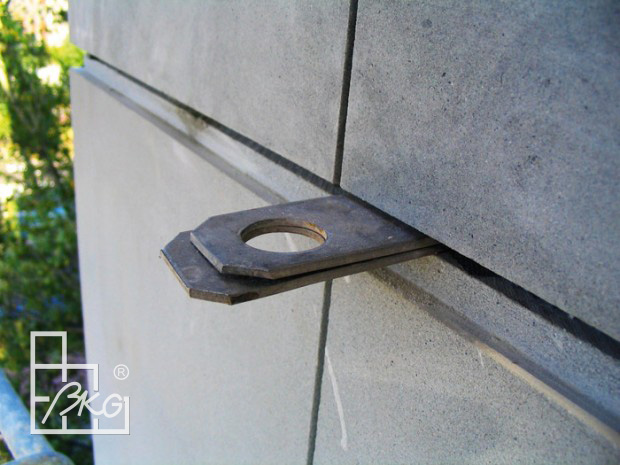
- While installing stone elements, two-part framed anchors are installed in places specified in the design layout. One part (fixed) is set at the back of stone element and is invisible. The second part are removable elements to which the frame is attached. In this moment the frame needs to be rebolted and the previous anchorage must be removed. For safety reasons this task requires caution on the workers part and needs to be supervised.
- Drilling of slots at the sides of stone elements is a common practice when installing the elevations. The facade elements are usually delivered with prior drilled holes for anchors in the sides. However, errors occur and the holes are not always in the proper place. Taking a single panel back to the workshop to drill a new hole is not economically justified. It is better to do it on the site using proper equipment. Dry drilling with a standard impact driller and a standard prolit-ending bit will cause more damage than good. The vibrations and hard stone dust appearing inside, which is not immediately removed outside cause mini cracks of slot sides, and consequently their weakening, which results in a smaller destructive strength when tearing the bolt out than in the tests. Such a slab is defective and cannot be mounted on the elevation.
- When the process of installation is finished, the frame is anchored and fixed, the elevation must be prepared for commissioning. The first stage is cleaning of the facade with a stream of water under pressure. It is necessary to clean the frame first and remove all dust that can contaminate the cleaned surface. Next, it is necessary to check if all the spacers have been removed. Left in the joints, the spacers may unbalance the individual panel load and not sustain the additional load.
- Proper stone resin putty is used for this purpose, their applying requires good workmanship as well as nearly artistic skills. In case of some stones, such as sand stone or black granite, such repairs should be neglected as they will always become visible in a short time – in a year or two, or in a few months. It is simpler, better and cheaper to replace the whole stone element. It is also the right moment for stone sealing if it is specified in the design plan and anti graffiti protection. The latter one is done up to 3 m from the ground level. The properly done sealing is nearly invisible, does not change the stone look and does not block its pores. The stone still breaths, but is water resistant. Sealing is not needed on polished granite. Although the sealing of textured granite surfaces is not essential, it makes their cleaning easier. However, it is worth remembering that sealing has limited durability. It is usually guarranted for 5-10 years. After this period, sealing must be repeated.
And it is basically finished. It can be commissioned. After the positive opinion, the scaffolding must be removed. The removable parts of anchor bolts should be handed over to the future user of the building together with the constructiondocuments with information where the actual framed anchor bolts are marked.
Sławomir Mazurek
Text and photographies come from the site: www.rynekkamienia.pl